It is much like a blueprint to benchmark against future progress or risks that might derail the project’s initial scope – which usually happens in project management.
So, how do you develop a project schedule that is simple enough to be understood by all stakeholders yet detailed enough to be followed by those who execute it?
Let’s check the theory first, and in the second part, we’ll look at a practical example.
Project schedule steps
While defining activities, sequences, resources, and activity timelines are viewed by the PMBOK as individual processes with inputs, tools, and output. This only applies to complex, long-term projects where unsupervised changes can become hairy problems overnight.
For simpler ones, you’re better off with a single, holistic process like in the infographic below:

Six steps to develop your project schedule
Let’s see what each step is all about.
1. Define the Work Breakdown Structure (WBS)
The work breakdown structure (WBS) is the foundation of every project schedule. It implies breaking down the work into smaller chunks that are easier to track and manage.
This builds control points throughout the project, so project managers know what deliverables to focus on, while clients have a clear picture of what to expect in return for their money.
Defining the WBS is possible through a technique called decomposition, which peels off the structure like an onion to reveal the following layers:
Work packages represent the smallest unit of work within a WBS. They are related to each other and contribute together to complete a deliverable. Like “building the foundation” is for the erection of a house.
Further down the road, activities spell out the effort it takes to complete a work package. By default, each one should come with a description to define the scope of work and additional attributes – like the resources assigned, duration, costs, and dependencies – which will be later specified in the project schedule. So, stick with the task description for now.
Milestones, unlike activities, don’t have a duration yet remain on the same level as them. They represent a significant event during the project life cycle that can either be mandatory, say the approval of a storyboard imposed by the client, or optional, like a testing phase before a feature deployment that you’ve figured is a good practice.
Note: The project manager should not double as the product manager. Since most beginners cannot distinguish between the two, we’ve outlined the difference in responsibilities, skill sets, and experience in this article on product manager vs. a project manager.
2. Sequence activities
Once all activities have been identified, it’s time to sequence them.
Before doing so, remember that each activity needs to have a predecessor (except for the first one, which marks the start of the project) and a successor (except the last one, which marks the end of the project). The same goes for milestones. Also, consider certain logical constraints that prevent some activities from happening before others do. For example, you can’t work on a project before meeting with your client to find out their requirements in the first place.
This being said, there are four types of dependencies you can use:
- Finish-to-Start (FS) – This is the most common type of dependency, which states that the predecessor activity must finish before the successor can start. If you don’t want to create a convoluted project schedule, stick with this one to do the heavy lifting.
- Finish-to-Finish (FF) – A successor activity can’t end before the predecessor ends. This usually means that activities will run in parallel, with a portion of the work to be delivered before the other one is completed.
- Start-to-Start (SS) – A successor activity can’t start until the predecessor starts. Again, this means that activities will run in parallel, with a portion of the work to begin after the other one begins.
- Start-to-Finish (SF) – Rarely used in project management, it implies that the predecessor activity must start before the successor ends. The cases are extreme; hence, refrain from using it to avoid confusion later.
To learn more about task dependencies with real-life examples, read our article.
Luckily, you can overwrite them through lag and lead time. Lag refers to the time added between a predecessor and a successor (a delay). In contrast, lead time refers to how much time a successor can be advanced about its predecessor (an overlap).
Although handy in critical situations when you’re tight on time, these scheduling methods should be used cautiously. Lag time, for instance, should never be used in a Finish-to-Start (FS) dependency, as the delay should be incorporated inside an activity’s duration. Otherwise, you’ll have difficulty monitoring the entire project schedule and accounting for future changes.
To continue with our house example, “setting tiles for a bathroom” with an FS logic to “painting the walls” has a 3-day lag. This means waiting until the paint dries is not incorporated in the initial task duration but hidden in the dependency.
Note: Floating activities without any predecessor and successor also exist. Inoffensive at first, they can delay the entire project if their duration exceeds the duration. You wouldn’t “coat the roof beams with fireproof paint” when handing over the house keys.
3. Identify resources
The goal is to identify the type of resource and amount of work required for each activity – human, supplies, or materials.
Don’t be fooled by how good things look on paper when choosing the right resource type. Always probe for your team’s skills, knowledge of industry processes, and proficiency in a specific tool, as this step is closely tied to how you’ll estimate costs later. Hire an inexperienced developer, for example, and you risk inflating your costs through training classes, or even worse, hire an external contractor until they ramp up to full speed.
You must also consider their availability during the project life cycle, including leave days, so you know whom to rely upon. However, there are simple apps for scheduling resources like the ones from this list of resource management tools.
As for the amount of work required, this has to do more with the number of hours or physical units it takes to complete an activity. Whether this needs to be tackled by one or more resources is irrelevant and can be later determined through a resource plan.
4. Estimate activity durations
So far, we’ve only gathered “ingredients” for the project schedule without developing it. The last step before this is to estimate activity durations, which, summed up, will give you a better picture of how long it takes to deliver the project.
A classic mistake is to assume that every resource works at 100% capacity, a far-reachable goal even for the most project-oriented organizations. Working over 40 hours/week has been proven by many scientific journals to increase the risk of cardiovascular diseases, depression, and eating disorders. So use some common sense and account for 70-80% efficiency for realistic or “human” results.
Regarding estimating, take advantage of the historical data from your previous projects, such as the budget, costs, and complexity implied. This works well for projects similar in structure and with an experienced team, yet not advisable due to its low level of accuracy.
For something more precise, use the three-point estimation method that takes into account the activity durations of their outcome of completion:
- Most likely (M) – Based on the current activity attributes and resource constraints
- Optimistic (O) – Minimum time required to complete an activity (best-case scenario)
- Pessimistic (P) – Maximum time required to complete an activity (worst-case scenario)
The final weighted formula – (O + 4M + P)/6 – renders a higher likelihood of the project being delivered on time.
Note: If you’re a business owner and want to get better at estimations, schedules, and workload, choose an online or computer-based time-tracking software for employees. One common reason is that project and work management software have come a long way. They have been tested for efficacy and excel in time-tracking, reporting, and invoicing. Many users like billing and invoicing software due to its accessibility and ease of use. Others opt for an online invoice generator, although an invoice builder is available in fewer languages.
If you piece all things together so far, you should end up with a network diagram similar to the one below:

Network diagram
5. Develop the project schedule
With the WBS, dependencies, resources, and estimates in place, it’s time to develop the project schedule. There are a couple of project scheduling techniques to ensure you’re acting within the boundaries of the scope-time-budget triad while keeping quality in check.
Critical Path Method
The Critical Path Method (CPM) depicts the minimum time to complete a project. It does so by analyzing each activity’s earliest and latest start and end dates, then going back and forth between them to determine the optimum path to choose – the critical one.
Beware though. Activities that show up on the critical path are not necessarily the most difficult or expensive ones. Instead, those which if they take longer to complete, will delay the project duration.
Each activity can have a float or slack, i.e., the number of days it can be extended without delaying the actual project or violating certain resource constraints. The CPM is designed to test the project schedule’s flexibility without altering its baseline.
Program Evaluation and Review Technique
Like the CPM, the Program Evaluation and Review Technique (PERT) is built on a network diagram. However, this one is a bit more realistic as it considers the weighted average duration of an activity rather than its actual duration.
It does so by also weighing the best and worst-case scenarios concerning the desired outcome, rendering the estimating formula we’ve discussed in the previous step.
Duration compression
Duration compression is, you guessed it, a way to reduce the project duration by implicitly reducing the duration of each activity on the critical path. So you can still meet your deadlines without compromising the project scope. There are two standard techniques:
- Crashing – Where you bring in new resources or pay overtime to deliver the project on time. Although feasible at first, crashing significantly increases the overall project cost and complexity due in part to the effort it takes to manage the additional resources.

Crashing technique
- Fast-tracking – Where you deliberately overlap two consecutive activities so they happen in parallel for a portion of time. Beware, though, as this might result in rework and increased risk, forcing you to sacrifice quality for the sake of meeting deadlines.
![]()
Fast-tracking technique
Resource optimization
Resource optimization techniques consider the available supply and demand for resources and how they can shorten the project duration. There are two common ones here as well:
- Resource leveling – Refers to adjusting the project schedule in such a way as to balance any over- or under-allocated resources. This is usually done by rearranging activities in a different sequence (in case a resource is overburdened) or changing the activity durations so only the critical ones get the necessary resources (in case there aren’t enough). Unfortunately, this will increase the critical path’s length and overall costs.
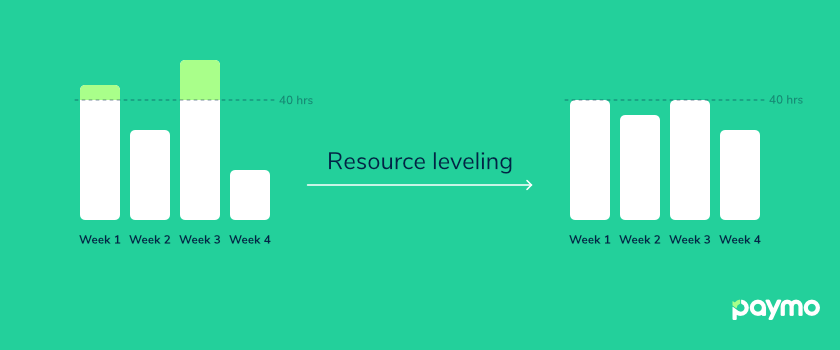
Resource leveling technique
- Resource smoothing – Quite the opposite of the previous one, it implies adjusting the resources not to exceed an imposed resource limit. This technique is primarily used when you can’t extend the project schedule. Because of this, the critical path will remain the same, meaning that activities can’t be delayed beyond their total float. Yet, not all resources can be “smoothed” in real life. Hence, resource smoothing is rarely recommended.

Resource smoothing technique
TIP: For more about resource planning, learn the difference between resource management and resource scheduling.
6. Review the project schedule
Once the project schedule is complete, it’s time to review it at periodic intervals – a process will help you correct deviations from the initial baseline and minimize risk in the long run. Here’s a couple of review techniques to choose from:
What-if scenarios – Address different situations and their effects that might delay the project. These can be anything from a significant delay to a contractor leaving business. You can then use the results and prepare contingency plans to protect yourself against these risks.
Trend analysis – As its name suggests, this technique looks at the project performance over a specific period to see whether it’s improving or lagging. Some parameters analyzed are the actual start and finish dates, the percentage of completed activities, and the remaining project duration.
Critical Chain Project Management (CCPM) – Considers the shortage of resources by adding buffer time to each activity, which can then be used to address sudden changes. As a result, the critical chain represents an altered form of the critical path with resource-leveling in place. That’s why, this time, you’re not looking to manage the remaining float but the difference between the remaining buffer and activity durations (those on the critical chain).
How to develop a project schedule in Paymo
Phew, that’s a lot of files to keep in order and techniques to remember. Luckily, a better way to develop a project schedule without losing your sanity is via project management software.
The clear advantage of a tool like this is that you can draw more complex diagrams than just pen and paper. The reviewing process becomes much more efficient as data feeds the system, so you’re better equipped to make the right decisions.
If you need to create a project schedule in just a few steps, then Paymo is the right tool for you.
Create a project schedule in just a few steps. Sign up for Paymo.
Let’s see how.
1. Define the Work Breakdown Structure (WBS)
The first thing to do is map out the WBS of a project. Here’s how each element of the structure translates in Paymo:
- Work packages → Task lists
- Activities → Tasks
- Milestones → Milestones
To explain them in more detail, task lists act as the main deliverables, which is why it’s a good practice to define them using a “noun-verb” structure so the outcome is clear.
Task lists are further broken down into tasks with attributes like assigned users, start and end dates, and task hourly budgets to be filled as you create the project schedule. Hover over a task; you’ll access them as quick action icons.

Task structure Paymo
A good practice is to list all the tasks in the order in which they will be sequenced, which will help us at the next step.
Milestones, on the other hand, are directly tied to a task list, acting more as a reminder on top of the work package that should be monitored by a responsible person (usually the project manager).

How to add a milestone in Paymo
Note: If you’re wondering how to become a project manager or what to study next, read this hands-on pm guide.
2. Sequence activities
At this point, you should have a list with all the tasks displayed in the order of their starting point.
To sequence tasks, one after another, first, change from List to Gantt Chart (top right corner).
Please don’t panic; the timeline is empty because we don’t have any task durations yet. So, for now, set each task duration to the smallest unit possible (1 day) through a click and drag on the timeline. We’ll take care of the actual durations at a later step.
Repeat this for every task, and you should have something like this:

Gantt Chart View in Paymo
A few words about the graphical representations:
- The blue rectangle stands for the project
- Gray rectangle stands for task lists
- Circular tubes stand for tasks (green – on track, red – off track)
- Yellow diamond stands for milestones
Good, we’re now ready! To create a dependency between tasks, hover over a task until two circles appear at the front and end.

Task dependency (1) in Paymo
Then, unite it with the circle of another task according to the type of dependency that you want to set. Paymo supports all four (FS, FF, SS, SF), but I will stick with the popular finish-to-start one for simplicity and do the same for the rest.

Task dependency (2) in Paymo
But say you want the “Design” and “Front-end development” tasks to overlap for one day. After all, developers can glance at the existing assets and start coding before the final ones are submitted. What then?
Luckily, Paymo allows you to set gap time in lead and lag time.
To do so, click on the dependency and either add a negative number (lead time, a.k.a. overlap time) or a positive number (lag time, a.k.a. delay time).

Gap time setting in Paymo
I go for the first option, an action that will turn the dependency from yellow to magenta to signal this change. Again, proceed with caution when doing so, as buffers and lags are not accounted for in the initial task duration, hence becoming hard to monitor as the project evolves.

Lead time in Paymo
3. Identify resources
Before assigning team members to tasks, ensure they’re available in the first place.
Check for the remaining hours under the Team Scheduling module (sidebar menu), right in front of each of their avatar. The resource scheduler also accounts for their leave days – the hachured areas – so you know who to rely upon or whether you should bring in additional resources.

Resource availability bar in Paymo
Pro Tip: If you only want to see your team’s availability without the tasks they’ve already been booked for, click the dropdown button in front of the Users table head (top left).
Alright. Now that you know this aspect, return to your project and switch from the Gantt Chart to List (top right corner). Then, hover over a task and click the Assign To icon to assign one or more responsible users.

How to assign users in Paymo
NOTE
The users must be assigned to the project first so you can further assign them to a task.
We did this because it’s much faster to do it here than on the timeline, where you have to double-click on every task name to access the full task details.
4. Estimate activity durations
With tasks and team members in place, the next step is to estimate the task durations individually.
Look back at similar projects you’ve dealt with to get an initial ballpark figure. Then, use some common sense – people can’t work at 100% capacity – in parallel with the three-point estimate formula to create realistic, achievable estimates.
When you’re done, hover over a task and click on the Set Dates icon to select a start and end date for completion.

How to set a task date range in Paymo
You can switch back to the Gantt Chart and pinch the task ends to extend or shorten them or glide over the timeline to change their duration.

Invalid task dependency in Paymo
Notice something? An invalid dependency is highlighted in red, as the task “Front-end development” ends on the same date the task “Back-end development” starts – 18th December.
One way to fix it would be to add a lead time and allow them to overlap for one day. But I don’t want that. The same resource, Mark, is also working on the next task, so I want to separate them to avoid confusion and give him some rest.
In this case, the best course of action is to forward the latter task manually or through the auto-scheduling functions under the More button. The Auto option considers all the lead and lag time, while the Auto-strict one ignores it.
I go for Auto, which keeps the lead time between the “Design” and “Front-end development” tasks while moving the “Back-end development” task forward by one day.

Auto scheduling setting in Paymo
Tip: Consider switching to other views, such as the Kanban board view, to monitor the work progress of all tasks. Paymo is among the best Kanban tools for project management, so use it to improve your workflow.
5. Develop the project schedule
The network diagram is now complete. Given the current resources and time constraints, what’s left is to come up with the best route to complete the project. As you’ve probably guessed, Paymo allows you to define the critical path in a few seconds.
Click the More button (top right) and check the Critical Path option.

How to determine the critical path in Paymo
You’ll see the longest path to complete the project, which takes into account the lead and lag time as long as you didn’t use the Auto Strict scheduling function.

The critical path for a project in Paymo
In this case, the critical path starts with “Research” and ends with “Back-end development.” The tasks in this chain are all “critical” because the project will also be delayed if one is delayed.
TIP: There
6. Review the project schedule
Congrats! You’ve just created the project baseline. A good practice is to export it as a PNG/SVG file from the Export as a button so you can compare it against further changes to the project timeline.
This function also proves helpful when clients require a status update before an important milestone.

How to export a Gantt Chart in Paymo
Speaking of keeping deliverables on track, Paymo allows you to view the time registered against a task through the Worked from Total column. This acts as an extra control point for project managers, besides milestones, to monitor the project progress in real-time.

Worked from total column for Gantt Chart in Paymo
I didn’t mention that the techniques used to create the project schedule at the previous step (under the theoretical part) can also be used when reviewing it – specifically, resource-leveling.
This is possible thanks to the Team Scheduling module that shows whether someone is over- or under-booked for a given day.

Remaining user availability in Paymo
NOTE
To learn how to perform proper resource leveling, read our article on creating a resource plan in Paymo.
Paymo limitations
Creating a project schedule in Paymo is not perfect. Here are a few things that would make the system fool-proof:
- Save the project baseline and track deviations in-app without exporting the project timeline first and manually comparing it with the current project schedule. Use Venngage’s project timeline template to simplify this process and ensure your project stays on track.
- Display milestones at the end of a task – they’re only displayed after a task list since it’s directly tied to it.
- Remaining bookable hours column for each user, so it’s much easier to perform resource leveling with a burndown graph of their total availability per week or month in front of you
[COMING SOON][AVAILABLE NOW].
NOTE: For software that remembers baselines with task hourly budgets, try other Gantt diagram tools.
Put your knowledge into practice.
Now that you’re armed with fresh knowledge, it’s time to put it into practice. Look back at one of your previous projects and draw a network diagram now that you know the outcomes.
Or try creating your virtual one and sign up for a free trial in Paymo.
Whether you define it with pen and paper or use a project management tool to do so, creating a project schedule is as real as it gets. So understand first, then implement it to protect yourself against future risks.

Andrei Țiț
Author
Andrei Țiț is a product marketer at Ahrefs. He has been involved in product marketing at various SaaS companies for over six years, specializing in content marketing and short-form video. In his free time, he enjoys cooking and traveling.

Laurențiu Bancu
Editor
Laurențiu started his marketing journey over 18 years ago and he's now an independent marketing consultant. He has extensive experience in work and project management, and business strategy. When not working, he’s probably playing board games or binge-watching mini-series.


